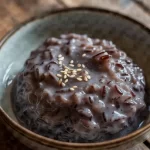
I love preparing my Homemade Coconut Ice Cream because it only requires full fat coconut milk, coconut cream, sugar, vanilla, and a pinch of salt. This dairy free treat pairs beautifully with a sundae or serves as a delightful topping on freshly baked brownies and apple crisp, adding a refreshing twist to classic desserts.

I recently stumbled upon a game-changing dessert that I just had to share with you all – the Best Homemade Coconut Ice Cream. I mixed up 2 cans of full-fat coconut milk with a can of coconut cream, a dash of granulated sugar, a teaspoon of vanilla extract and even a pinch of salt.
Trust me, this dairy free coconut treat is so simple to make and it really surprises you with how rich and creamy it goes. I always thought homemade ice cream recipes that use coconut milk were complicated but this one proved me wrong.
It’s not just an ice cream sundae filler, its also a great topping for baked goodies like apple crisp or even warm brownies. If you enjoy experimenting with vegan coconut ice cream, this healthy twist is a must try.
Give it a go and let the tropical goodness melt into your day.
Why I Like this Recipe
I really dig this recipe because it’s super easy to throw together, like you literally just mix a few things and boom, homemade coconut ice cream.
I love that it’s dairy free so even when I’m hangin’ with friends who can’t have dairy, everyone gets a treat.
It’s also insanely creamy, thanks to the coconut milk and cream, which gives it a rich and tropical flavor that’s hard to beat.
Plus, I enjoy how versatile it is – I can use it as a topping for something like apple crisp or brownies, or just a classic ice cream sundae, which always makes me feel like I’m doin’ something extra special.
Ingredients

- Full-fat coconut milk: Adds creamy texture, healthy fats, and rich coconut flavor.
- Coconut cream: Thick and indulgent, intensifying natural coconut taste and smooth consistency.
- Granulated sugar: Provides sweetness while helping to blend and balance all flavors.
- Vanilla extract: Enhances aromatic flavor with a touch of natural, mellow sweetness.
- Salt: A pinch that boosts overall flavor, intensifying both sweet and tangy notes.
- The dairy-free fats offer nutrients and contribute to the ice cream’s velvety mouthfeel.
- Combined, these ingredients delivers tropical vibes and a satisfyingly creamy dessert.
- This blend not only tastes great but also offers subtle nutritional benefits.
Ingredient Quantities
- 2 cans (14 oz each) full-fat coconut milk
- 1 can (14 oz) coconut cream
- 3/4 cup granulated sugar
- 1 teaspoon vanilla extract
- A pinch of salt
How to Make this
1. In a big bowl, mix both cans of coconut milk, the coconut cream, sugar, vanilla extract and a pinch of salt until the sugar is mostly dissolved.
2. If you want to ensure the sugar really dissolves, you can heat half of the mixture in a saucepan over medium-low heat for about 5 minutes then mix it back in with the rest.
3. Let the mixture cool down completely before covering it with plastic wrap and putting it in the fridge for at least 2 hours (overnight works even better).
4. Once its nice and cold, pour the mixture into your ice cream maker and churn it according to the machine’s instructions.
5. Keep churning until the ice cream looks thick and creamy, kind of like soft serve.
6. Scoop the churned ice cream into an airtight container.
7. Freeze the container for at least 3 hours so the ice cream firms up a bit more.
8. When you’re ready to serve, let the ice cream sit at room temperature for about 10 minutes so it softens enough for easy scooping and enjoy!
Equipment Needed
1. Big mixing bowl – A sturdy bowl big enough to mix both cans of coconut milk and other ingredients.
2. Measuring cups and spoons – These help to measure out the sugar, vanilla extract and salt accurately.
3. Whisk or wooden spoon – Use this for stirring the mixture until the sugar mostly dissolves.
4. Saucepan – Needed to heat half of the coconut milk mixture over medium-low heat.
5. Stove – Essential for warming up the mixture in the saucepan for about 5 minutes.
6. Plastic wrap – This is used to cover the bowl once the mixture is cool before putting it in the fridge.
7. Ice cream maker – You will need this to churn the mixture until it turns thick and creamy.
8. Airtight container – Perfect for transferring the churned ice cream and then freezing it for at least 3 hours.
9. Freezer – Finally, you will need a freezer to firm up the ice cream before serving.
FAQ
The Best Homemade Coconut Ice Cream Recipe Substitutions and Variations
- Coconut milk: You can try almond milk that’s full fat or even cashew milk for a creamier consistency though the flavor changes a bit
- Coconut cream: Heavy whipping cream or full fat evaporated milk work well to give a rich texture similar to coconut cream
- Granulated sugar: You might substitute honey or coconut sugar if youre looking for a natural twist even though it might make it a bit sweeter or less chunky
- Vanilla extract: Maple extract or almond extract could be used so long as you dont mind a slight shift in the flavor profile
- Salt: A pinch of sea salt can be used instead and adds a little extra flavor without overwhelming the taste
Pro Tips
1. Try heating half of your mix just enough to dissolve all the sugar back in thoroughly – it really does help prevent any graininess later on even if it takes a little extra time.
2. Don’t rush the chilling process; letting the mix cool completely in the fridge overnight really makes the ice cream smoother when it’s churned.
3. Keep an eye on your ice cream maker because over churning can lead to a slushy texture – aim for that soft serve consistency before transferring to the freezer.
4. When it’s time to serve, let your ice cream sit out for about 10 minutes to soften up a little – it helps a lot with scooping and keeping it tasting fresh.

The Best Homemade Coconut Ice Cream Recipe
I love preparing my Homemade Coconut Ice Cream because it only requires full fat coconut milk, coconut cream, sugar, vanilla, and a pinch of salt. This dairy free treat pairs beautifully with a sundae or serves as a delightful topping on freshly baked brownies and apple crisp, adding a refreshing twist to classic desserts.
8
servings
268
kcal
Equipment: 1. Big mixing bowl – A sturdy bowl big enough to mix both cans of coconut milk and other ingredients.
2. Measuring cups and spoons – These help to measure out the sugar, vanilla extract and salt accurately.
3. Whisk or wooden spoon – Use this for stirring the mixture until the sugar mostly dissolves.
4. Saucepan – Needed to heat half of the coconut milk mixture over medium-low heat.
5. Stove – Essential for warming up the mixture in the saucepan for about 5 minutes.
6. Plastic wrap – This is used to cover the bowl once the mixture is cool before putting it in the fridge.
7. Ice cream maker – You will need this to churn the mixture until it turns thick and creamy.
8. Airtight container – Perfect for transferring the churned ice cream and then freezing it for at least 3 hours.
9. Freezer – Finally, you will need a freezer to firm up the ice cream before serving.
Ingredients
-
2 cans (14 oz each) full-fat coconut milk
-
1 can (14 oz) coconut cream
-
3/4 cup granulated sugar
-
1 teaspoon vanilla extract
-
A pinch of salt
Directions
- In a big bowl, mix both cans of coconut milk, the coconut cream, sugar, vanilla extract and a pinch of salt until the sugar is mostly dissolved.
- If you want to ensure the sugar really dissolves, you can heat half of the mixture in a saucepan over medium-low heat for about 5 minutes then mix it back in with the rest.
- Let the mixture cool down completely before covering it with plastic wrap and putting it in the fridge for at least 2 hours (overnight works even better).
- Once its nice and cold, pour the mixture into your ice cream maker and churn it according to the machine's instructions.
- Keep churning until the ice cream looks thick and creamy, kind of like soft serve.
- Scoop the churned ice cream into an airtight container.
- Freeze the container for at least 3 hours so the ice cream firms up a bit more.
- When you're ready to serve, let the ice cream sit at room temperature for about 10 minutes so it softens enough for easy scooping and enjoy!
Notes
- Below you’ll find my best estimate of this recipe’s nutrition facts. Treat the numbers as a guide rather than a rule—great food should nourish both body and spirit. Figures are approximate, and the website owner assumes no liability for any inaccuracies in this recipe.
Nutrition Facts
- Serving Size: 167g
- Total number of serves: 8
- Calories: 268kcal
- Fat: 18.25g
- Saturated Fat: 15.5g
- Trans Fat: 0g
- Polyunsaturated: 1g
- Monounsaturated: 1g
- Cholesterol: 0mg
- Sodium: 10mg
- Potassium: 113mg
- Carbohydrates: 21.5g
- Fiber: 0g
- Sugar: 18.75g
- Protein: 1.6g
- Vitamin A: 0IU
- Vitamin C: 2mg
- Calcium: 20mg
- Iron: 1mg


![Thai Coconut Soup [Coconut Milk Soup] Recipe](https://bangkokbowl.com/wp-content/uploads/2025/06/Collage_Thai-Coconut-Soup-Coconut-Milk-Soup-_1751036922-150x150.webp)